
Understanding ISO in Landscape Photography
- Amos Ravid

- Mar 12
- 11 min read
Updated: Mar 13
What exactly is ISO, how is it related to noise, is it really a part of the exposure triangle, and what ISO should you shoot at?
All this and more, including practical insights, in the guide to understanding the ISO in landscape photography

ISO is a basic concept in photography and in landscape photography in particular. Every beginning photographer knows that ISO is related to the brightness level of the image (a higher ISO equals a brighter image) and that high ISO levels create a grainier image. And although the bottom line is that most of us act more or less correctly, not many delve into understanding this non-trivial topic, which creates quite a few misconceptions about it, not to mention mistakes. The following article will try to shed some light on ISO in landscape photography.
What is ISO
ISO (*International Standardization Organization) is an international standard that was established back in the film era and adopted by manufacturers with the transition to the digital world. It is known as one of the three vertices of the exposure triangle (along with exposure time and aperture) that together determine the brightness of the image. But, in truth, ISO has nothing to do with exposure, and it only comes into play after the exposure has already ended.
Many define it as the sensor's sensitivity to light. It may be convenient to present it this way, but what was true for film is very inaccurate for digital photography. The sensor has one and only sensitivity level that cannot be adjusted, and ISO has nothing to do with the sensor.
So what ISO is? The ISO is actually an artificial amplification of the image's brightness that occurs after the light is recorded by the sensor. ISO can be viewed as calibrating the image's brightness level for a given amount of light. Sound like Chinese? Don't worry, we'll explain this in more details later.
(*) Why the name of the international organization was chosen to serve as the name of a feature dealing with image brightness is not entirely clear. It just is.
 |
Is it important to understand ISO?
ISO is a somewhat obscure topic that is often pushed to the sidelines. Most photographers usually prefer to skip it and not delve into it too much. In fact, there are several quite logical reasons for this:
It is a very technical and non-trivial topic related to the core of the digital camera operation and usually occupies more electronics engineers and physicists than photographers. Probably rightly so.
In complete contrast to what was said in section #1, the bottom line is actually relatively simple to apply, so you can just jump straight to the conclusions and accept them as a given. Even if we don't understand exactly why, most of us know that shooting at a high ISO creates more noise in the image and rightly prefer to shoot at a low ISO (if possible) to avoid this.
Unlike aperture and exposure time, ISO has no artistic significance, and is related only to the quality of the image and its technical soundness. ISO is used more as a supplementary vertex (hereinafter "the fourth vertex").
Complementary but not without importance. So yes, it's still worth getting to know the topic, and I hope that those who stick around to the end will gain some useful insights from reading the article.

What do the numbers mean?
According to the concept of stops, each ISO value (a stop) represents twice the brightness of the previous value. At ISO 200, the image will be two times (200 percent) brighter than ISO 100 (all other conditions being the same). ISO 400 is four times brighter, 800 is eight times brighter, and so on. For example, lowering the ISO by one stop requires increasing the exposure time or aperture by one stop to maintain the same brightness of the image. Similar to exposure time and aperture, most cameras allow you to change the ISO in parts of stops, not just whole stops.
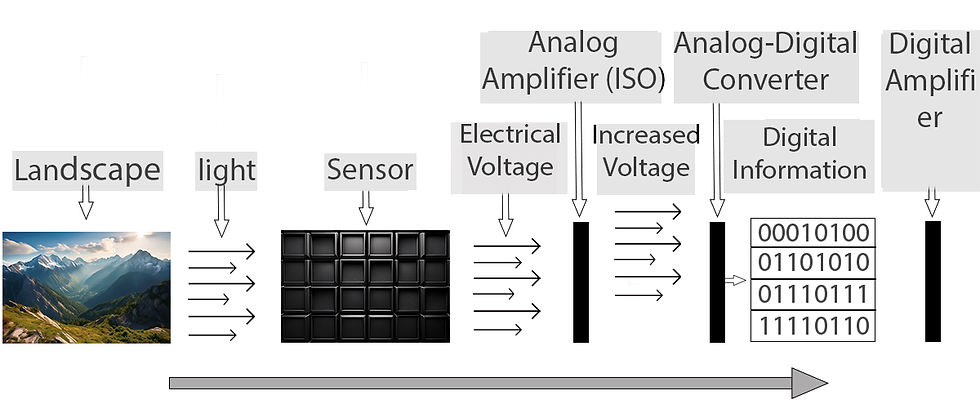
How does a digital camera work?
To understand exactly what ISO is, it is impossible to escape a brief explanation of how a camera works. How it converts photons of light into digital information from which computers can produce an image. Since this is a technical topic, we will try to provide as much relevant information as possible without losing focus. To understand where and how exactly ISO comes into play, we will briefly go over the steps in creating a digital image. Stay with me, it is short:
The process begins by exposing the sensor to light for the time we have set (the exposure time). Each pixel record a different amount of light particles (photons) depending on the level of illumination of the scene.
The light particles recorded by the sensor are converted into electrical voltage.
Analog amplification: Increasing the electrical voltage that represents the intensity of light. This is a step of special significance in our discussion because the degree of analog amplification is the ISO. A higher ISO equals a stronger amplification. Note that ISO is an "artificial" amplification of light and is not related to exposure or sensitivity.
Converting analog voltage into digital information that computers can read.
Digital amplification. This is simply the multiplication of the digital information that occurs when using extended ISO values. We will touch on this briefly below.
Note that ISO increases the brightness of the image and not the amount of light. This is an important distinction!
What is noise?
ISO doesn't work for free. It charges a price for its brightness-boosting services. In cash, and in payments. Modern cameras are becoming more and more accurate, but there are still misses here and there. Each such "miss" may create an inaccurate pixel, which is called "noise" in the language of photographers. Noise can come from various sources, from the way light itself behaves and from various electronic interferences throughout all stages of the process, before and after analog amplification. Why is noise more noticeable in the dark areas of the image? Imagine a situation where the camera missed a reading of one photon out of 100 (one percent) compared to a situation where it missed that one photon out of 10 (ten percent). In the darker situation, the ratio of noise to real light is much greater and will therefore be more significant and noticeable.
Why does shooting at a high ISO create noise?
ISO, as mentioned, is the amplification of the analog electrical signal that represents the amount of light absorbed by the sensor. But along with the real light, noise is also beeing increased. A high ISO not only increases the brightness of the image but also the brightness of the noise. Add to this the higher noise/image ratio in a dark image (which is the natural candidate for shooting at a high ISO) and you get the reason why at a high ISO the noise is more prominent in the image. This, by the way, is also the basis for the idea of Expose To The Right (ETTR) concept, but more on that in another time. The level of noise and the degree of tolerance to high ISO also depends to a large extent on the quality of the camera and its sensor.

You can liken the noise amplification of the ISO to listening to music recorded at a concert. When the music is quiet and we turn up the volume to hear better, all the background noise in the concert hall that was recorded with it is also amplified. When the music is loud and there is no need to amplify, the background noise will be negligible and imperceptible. |
ISO and Dynamic Range
And if that's not enough, here comes the second payment. High ISO reduces the dynamic range (the camera's ability to simultaneously capture bright and dark details in an image). When shooting at high ISO, we are underexposing the image in advance (to compensate for the high ISO), meaning we are giving up parts of the dynamic range in advance. Increasing the brightness with ISO does not restore the dynamic range to its original state, but simply makes the reduced range brighter (see diagram).

Base ISO
Here we come to the point. This is perhaps the most significant concept in our discussion. The base ISO does not artificially amplify the light, and therefore has minimal noise and maximum dynamic range. This is the golden number. Note - the base ISO is not necessarily 100 as many tend to think (although in many cameras it is). It is also not necessarily the lowest ISO that your camera offers. It differs from camera to camera and manufacturer to manufacturer (in my camera, for example, it is 64). To find out what the base ISO is, check your camera's specifications or search for Base ISO + the camera name and model on Google. Check, it is important.
Natural ISO and Extended/Simulated ISO
If you check your camera's specifications, you will see that it "boasts" very high (and low) ISO values, called Extended ISO, which are above (and below) the natural ISO values. Extended ISO is a digital light increase (or decrease), simply a multiplication of the numbers, performed by the camera's processor. Since it is performed towards the end of the process (see diagram above), it includes all the noise that was added along the way (unlike analog amplification, which is performed at an early stage and only increases the noise created up to it). Therefore, extended ISO is equivalent to brightening the image in your editing software, but with one drawback - it is performed in a "stupid" way, with the same intensity for all light levels, thus reducing the dynamic range and potentially burning out the bright areas in the image. And the additional bad news: the exact same thing applies to low extended ISO that is available in many cameras. You can use it when you want to lengthen the shutter speed, but you should consider whether it would be better to use an ND filter instead.

So what ISO should you shoot at?
The answer, of course, depends on the circumstances. The goal is to shoot at the camera's basic ISO and utilize the natural light as long as possible, without needing to artificially boost it in the form of a high ISO. That is, to use the aperture, exposure time, and natural lighting as much as possible (remember the alternative exposure triangle from above?). The lighting in landscape photography is not really under our control, but the other two certainly are. A wider aperture (and focus stacking if needed) or a longer exposure (and using a tripod if needed) will make it in most cases. "Real" light is always better than a higher ISO.
When to raise the ISO?
As mentioned, raising the ISO has its costs, and prices, as we know, are only paid when the deal is worth it. Shooting at a high ISO is a good solution when the conditions dictate it, and not by default. That is, in any case where more light is needed and a longer exposure time or a wider aperture is not a good or sufficient option (*). This can occur in one of the following situations (or a combination of them):
Simply when there is not enough light. Night landscape photography is an example of the need for extreme ISO to capture enough light.
Freezing motion - of elements in the scene (people, branches, leaves, etc.) or of the photographer (in handheld photography).
Depth of field - when you want to shoot with a closed aperture for a large depth of field but the light conditions limit this.
In short, in any case where shooting at the basic ISO compromises the quality of the image or your creative idea.
(*) A stronger lighting on the subject is also an option, but less relevant in landscape photography.

Is raising the ISO equivalent to correcting brightness in post processing?
Excellent question (see the ISO Invariant section below). In most cameras, shooting in the dark at a low ISO and digitally amplifying in post processing will produce a noisier result than shooting at a Higher ISO and properly expose. Digital amplification in editing increases all the noise created throughout the entire image creation process, before and after analog amplification, while raising the ISO during photography only increases the noise created before analog amplification. Therefore, it is better, in cases where there is no other choice, to raise the ISO to get a proper exposure already in camera and not wait until editing.
ISO Invariant Cameras
Two last points that are worth knowing and I will talk about them very briefly to avoid overload (if you have already reached this point, you can simply skip this). ISO Invariant is a relatively new and controversial topic. Would you like the camera to allow you to brighten the image in editing (digital enhancement) without the additional cost of excess noise (beyond the noise of raising the ISO)? Probably yes. In some cameras, the level of noise added to the image after analog enhancement is so low that there is essentially no difference between raising the ISO in photography and brightening the image in editing. The result is the same. Just remember, this does not mean that there will be no noise in the image (it will simply be the same in both cases), and that it is always (!) better to rely on correct exposure using natural light and not on its amplification (whether analog or digital). In any case, the matter is relevant to shooting raw files only (and not jpeg).
Dual Gain Sensor
Certain models of modern (and often expensive) cameras include sophisticated sensors with two basic ISO values, high and low, for the benefit of cleaner images even when a higher ISO is needed. If you have such a camera, a photo at a high basic ISO will be cleaner than a photo at a slightly lower ISO.

Operative conclusions
If you managed to get this far, then here is your bonus for perseverance, the bottom line of this whole long story. The recommended ISO policy for landscape photography (and photography in general):
It is always better to shoot at the camera's base ISO and, if possible, manage with the real light (by exposure time, aperture or lighting).
If you still need to raise the ISO:
In the natural ISO range - it is better to raise the ISO than to shoot a dark image and open it in editing.
In the simulated (extended) ISO range - it is better to shoot at the camera's highest natural ISO and open only the dark ones in editing.
As usual, it is better to shoot raw files.
Definitely a final summary
Modern cameras handle high ISO quite well, so you should not avoid raising the ISO at all costs. When necessary, it is always better than a dark or blurry image (you can later partially clean up the noise in your editing program). But when you don't have to, you don't have to. The goal is to shoot at the base ISO and utilize the real amount of light reaching the sensor through the aperture and exposure time. Because the bottom line is that even today, real light is the raw material of photography.


Comments